All posts by dinis

Common issues building CPAN Perl modules to RPMs

Recently I've been compiling several Perl modules for installation on new CentOS 7 machines because we'll be using it to deploy several Catalyst and Mojolicious applications.

The tools

I've mainly used the following tools

  • cpanspec - generates spec files for Perl modules from CPAN available through yum in epel repos:

    sudo yum install cpanspec

  • rpmbuild - build rpm packages, available in rpm-based systems

The cycle

cpanspec -v --packager "My Packager Name" GD::SecurityImage
mv *.spec rpmbuild/SPECS/.; mv *.tar.gz rpmbuild/SOURCES/.
rpmbuild -ba rpmbuild/SPECS/perl-GD-SecurityImage.spec

Common issues - and work-arounds

My main purpose in writing this post was to compile and share the most common issues I ran into while building RPMs from CPAN modules. Hope this helps you and probably my future-self.

Modules using Module::Build::Tiny

(solved in cpanspec master with Leon's PR) CPAN modules that use Module::Build::Tiny instead of the most commonly used Module::Build present the following error:

!!!!!!!!!!!!!!!!!!!!!!!!!!!!!!!!!!!!!!!!!!!!!!!!!!!!!!!!!!!!!!!!!!!!!!!!
ERROR: Can't create '/usr/local/share/man/man3'
Do not have write permissions on '/usr/local/share/man/man3'
!!!!!!!!!!!!!!!!!!!!!!!!!!!!!!!!!!!!!!!!!!!!!!!!!!!!!!!!!!!!!!!!!!!!!!!!
 at /usr/local/share/perl5/Module/Build/Tiny.pm line 119.

(if you don't, I'd guess you're building the modules with root, which can get you in a lot of trouble)

This is caused by the lack of support by the Tiny module of all the types of arguments available in Module::Build (this is not really a bug but a design option). The arguments passed should have the -- prefix (check Leon's comment on the subject), so, the solution is to edit the spec file and in the sections %build and %install fix the arguments:

--installdirs
--destdir
--create_packlist

Now you can run rpmbuild and everything should be fine.

Packages hidden from PAUSE

For some reason (please tell me why) many distributions hide some namespaces from PAUSE (Perl Authors Upload Server) - HTML::FormHandler example. This causes yum to fail on install, which is quite unpleasant.

Error: Package: perl-HTML-FormHandler-0.40059-1.el7.centos.noarch (/perl-HTML-FormHandler-0.40059-1.el7.centos.noarch)
           Requires: perl(HTML::FormHandler::Meta::Role)
 You could try using --skip-broken to work around the problem
 You could try running: rpm -Va --nofiles --nodigest

A side-effect of hiding the namespace from PAUSE was that neither cpanspec or rpmbuild was able to identify that the HTML::FormHandler::Meta::Role was provided by that same module and listed it as a dependency. You could just add AutoReq: no after the remaining Requires in the spec file but I find that a better work-around is to add:

Provides:       perl(HTML::FormHandler::Meta::Role)

so that rpmbuild and remaining tools now know that this module already has that class. rpmbuild/SPECS/perl-HTML-FormHandler.spec -> Provides

Missing files in MANIFEST - Installed (but unpackaged) file(s) found

Some packages just don't include all the files that they provide (e.g. Test::Harness):

error: Installed (but unpackaged) file(s) found:
   /usr/bin/prove
   /usr/share/man/man1/prove.1.gz

The solution is simple: just double-check that nothing out of the ordinary is there and add the list to the %files spec section. Just copy & paste - that easy.

Bogus paths

Not all module packages are created equal, and some of them, are bogus...

BOGUS PATH DETECTED: PDF-Table-Version_0.9.7/
...
Skipping PDF-Table-0.9.7.tar.gz with 24 path elements!

To fix this issue you'll need to re-package the module but it should be rather easy:

mkdir tmp
cd tmp/
tar xzvf ../PDF-Table-0.9.7.tar.gz
mv PDF-Table-Version_0.9.7/ PDF-Table-0.9.7/
tar czvf PDF-Table-0.9.7.tar.gz PDF-Table-0.9.7
cp PDF-Table-0.9.7.tar.gz ../
cd ..
cpanspec PDF-Table-0.9.7.tar.gz

Now you'll be able to successfully create your .spec file and continue building that module.

Polluted environment - File not found

An error that got me spinning around for hours occurred when rpmbuild could not find some build files, around the lines of:

RPM build errors:
 File not found by glob

I think this is caused by CPAN it might alter your environment with something similar to:

PERL_MM_OPT=INSTALL_BASE=/home/rpmbuild/perl5

As a work-around it's possible to just unset the constant:

unset PERL_LOCAL_LIB_ROOT
unset PERL_MM_OPT
unset INSTALL_BASE
unset PERL_MB_OPT

See also

Changelog

  • Thanks to Thibault for PERL_MB_OPT

IP range routing – some steps into routing debugging

Recently, I had some issues with IPs not being routed to my server. The first time something like this happened I ended up locking myself out with bad network configurations and no network access to the machine. But well, learning from my mistakes, I now was able to avoid that scenario. Although, I was still struggling to get the IPs set-up on the server. Turns out, the IP range wasn't being routed to my server.

What I learned from this situation was how to better interpret traceroute output, and some routing mechanics. As I understand it now, routers are usually configured in a rather "lazy" way. So, even if the router already has a routing rule configured for the server, it will only "come to live" in the traceroute after the IP is configured on the server. That could be as easy as:

# ifconfig eth0:1 104.121.70.190 up

After that, if the router is configured correctly it'll go from CASE 1 to CASE 3. By analysing the last ip in the traceroute we should be able to see the router's IP (in my case 64.120.243.194) as the last entry. If it's not there, there's most likely an issue with the routing tables.

Some other useful commands for testing the traffic going through:

  • # tcpdump -i any icmp - View all ping requests going through any interface
  • # nmap -sP -PN --traceroute --reason -n 104.121.70.190 - friendlier output for traceroute

These 3 cases illustrate some different scenarios and will definitely help me analyse future routing issues.

CASE 1: IP not routed to any server - ends up without any further response, and never seeing your ip in the "path"

If you have the IP configured on the server, this probably means the router is still not correctly configured.

$ sudo traceroute 104.121.70.190
traceroute to 104.121.70.190 (104.121.70.190), 30 hops max, 60 byte packets
1 dsldevice.lan (192.168.1.254) 0.873 ms 1.032 ms 1.217 ms
2 * * *
3 bl3-73-29.dsl.telepac.pt (213.13.73.29) 14.384 ms 14.681 ms 14.955 ms
4 lis1-cr1-hu4-0-0.cprm.net (195.8.10.25) 10.341 ms 10.317 ms 10.277 ms
5 mia1-cr1-te0-0-0.cprm.net (195.8.0.178) 84.083 ms 84.048 ms 84.008 ms
6 xe-8-3-0.mia10.ip4.tinet.net (77.67.78.85) 81.857 ms 77.271 ms 76.924 ms
7 xe-2-3-0.nyc41.ip4.tinet.net (141.136.111.9) 111.017 ms 112.177 ms 112.652 ms
8 gtt-gw.ip4.tinet.net (199.229.230.94) 115.666 ms 112.209 ms *
9 ae3-80g.cr1.ewr1.us.nlayer.net (69.31.94.117) 110.117 ms 110.881 ms 110.557 ms
10 xe-0-0-3.cr1.phl1.us.nlayer.net (69.22.142.161) 114.189 ms 113.830 ms 114.311 ms
11 198.47.110.30 (198.47.110.30) 118.809 ms 117.353 ms 117.998 ms
12 tn1-02.cor01.dupa01.hostnoc.net (96.9.191.2) 117.775 ms 118.002 ms 117.150 ms
13 vl0201.agg01.ded.dupa01.hostnoc.net (64.120.184.166) 118.866 ms 117.849 ms 118.208 ms
14 vl0107.bl1101.dupa01.hostnoc.net (64.120.243.194) 119.561 ms 119.607 ms 118.369 ms
15 * * *
16 * * *
17 * * *
18 * * *
19 * * *
20 * * *
21 * * *
22 * * *
23 * * *
24 * * *
25 * * *
26 * * *
27 * * *
28 * * *
29 * * *
30 * * *

CASE 2: IP routed to server but not configured (bounces between the "last" router and the server main ip)

Note: as I later noticed this only happens after the server had already been configured to use that ip but it's removed. This causes the server to not find a rule

$ sudo traceroute 104.121.70.190
traceroute to 104.121.70.190 (104.121.70.190), 30 hops max, 60 byte packets
1 dsldevice.lan (192.168.1.254) 1.161 ms 1.396 ms 1.659 ms
2 * * *
3 bl3-72-29.dsl.telepac.pt (213.13.72.29) 14.358 ms 14.339 ms 14.300 ms
4 lis1-cr1-hu4-0-0.cprm.net (195.8.10.25) 8.523 ms 14.215 ms 14.174 ms
5 mia1-cr1-te0-0-0.cprm.net (195.8.0.178) 92.087 ms 92.061 ms 92.023 ms
6 xe-8-3-0.mia10.ip4.tinet.net (77.67.78.85) 82.328 ms 77.430 ms 77.307 ms
7 xe-2-3-0.nyc41.ip4.tinet.net (141.136.111.9) 111.292 ms 112.534 ms 111.403 ms
8 gtt-gw.ip4.tinet.net (199.229.230.94) 114.183 ms 115.369 ms 116.087 ms
9 ae3-80g.cr1.ewr1.us.nlayer.net (69.31.94.117) 112.315 ms 119.415 ms 115.055 ms
10 xe-0-0-3.cr1.phl1.us.nlayer.net (69.22.142.161) 115.342 ms 113.859 ms 113.820 ms
11 198.47.110.30 (198.47.110.30) 118.461 ms 117.984 ms 116.879 ms
12 tn1-02.cor02.dupa01.hostnoc.net (96.9.191.6) 310.551 ms 309.764 ms 308.366 ms
13 vl0202.agg01.ded.dupa01.hostnoc.net (64.120.184.170) 118.070 ms 117.617 ms 118.814 ms
14 vl0107.bl1101.dupa01.hostnoc.net (64.120.243.194) 120.308 ms 120.045 ms 120.357 ms
15 104-121-50-210.static.hostnoc.net (104.121.50.210) 119.878 ms 120.898 ms 121.256 ms
16 104-121-50-209.static.hostnoc.net (104.121.50.209) 124.838 ms 120.848 ms 120.891 ms
17 104-121-50-210.static.hostnoc.net (104.121.50.210) 117.659 ms 116.994 ms 118.228 ms
18 104-121-50-209.static.hostnoc.net (104.121.50.209) 119.360 ms 119.217 ms 126.278 ms
19 * * *
20 104-121-50-209.static.hostnoc.net (104.121.50.209) 118.766 ms 124.257 ms 124.143 ms
21 * * *
22 104-121-50-209.static.hostnoc.net (104.121.50.209) 122.279 ms 124.911 ms 123.907 ms
23 * * *
24 104-121-50-209.static.hostnoc.net (104.121.50.209) 119.758 ms 119.936 ms 119.309 ms
25 * * *
26 104-121-50-209.static.hostnoc.net (104.121.50.209) 124.762 ms 122.253 ms 122.464 ms
27 * 104-121-50-210.static.hostnoc.net (104.121.50.210) 123.030 ms 122.997 ms
28 104-121-50-209.static.hostnoc.net (104.121.50.209) 124.775 ms 125.393 ms 125.737 ms
29 104-121-50-210.static.hostnoc.net (104.121.50.210) 125.112 ms 125.075 ms 125.330 ms
30 104-121-50-209.static.hostnoc.net (104.121.50.209) 126.358 ms 128.547 ms 128.903 ms

CASE 3: IP routed and configured on the server

$ sudo traceroute 104.121.70.190
traceroute to 104.121.70.190 (104.121.70.190), 30 hops max, 60 byte packets
1 dsldevice.lan (192.168.1.254) 0.793 ms 1.018 ms 1.243 ms
2 * * *
3 bl3-72-29.dsl.telepac.pt (213.13.72.29) 8.450 ms 8.421 ms 8.383 ms
4 lis2-cr1-hu-3-0-0.cprm.net (195.8.10.201) 10.058 ms 10.035 ms 10.228 ms
5 mia1-cr1-te1-4-0.cprm.net (195.8.0.182) 85.074 ms 85.051 ms 85.234 ms
6 xe-8-3-0.mia10.ip4.tinet.net (77.67.78.85) 81.829 ms 77.844 ms 77.432 ms
7 xe-2-3-0.nyc41.ip4.tinet.net (141.136.111.9) 111.521 ms 111.487 ms 113.351 ms
8 gtt-gw.ip4.tinet.net (199.229.230.94) 117.949 ms 118.190 ms 117.317 ms
9 ae3-80g.cr1.ewr1.us.nlayer.net (69.31.94.117) 113.542 ms 113.215 ms 114.055 ms
10 xe-0-0-3.cr1.phl1.us.nlayer.net (69.22.142.161) 119.913 ms 119.754 ms 119.074 ms
11 198.47.110.30 (198.47.110.30) 123.665 ms 123.872 ms 124.098 ms
12 tn1-02.cor01.dupa01.hostnoc.net (96.9.191.2) 123.589 ms 124.269 ms 123.245 ms
13 vl0201.agg01.ded.dupa01.hostnoc.net (64.120.184.166) 123.177 ms 124.095 ms 123.898 ms
14 vl0107.bl1101.dupa01.hostnoc.net (64.120.243.194) 120.727 ms 122.194 ms 122.494 ms
15 104-121-50-210.static.hostnoc.net (104.121.50.210) 124.726 ms 123.289 ms 123.663 ms
16 104-121-70-190.static.hostnoc.net (104.121.70.190) 123.720 ms 125.139 ms 124.116 ms

Sign pdf documents with Smart Card (Portuguese ID Card – Cartão de Cidadão) – free software (Linux/Mac/Windows)

As of the time of first writing this post, the middleware for the Portuguese ID Card is not fully working with Windows 8.1 (though it works perfectly with Windows 8.0).

The following steps are specific to the Portuguese ID Card but might also be useful or similar with other cards.

1. Install Card Reader middleware software

First, we need to install the middleware available on the website:

http://www.cartaodecidadao.pt/index.php%3Foption=com_content&task=view&id=102&Itemid=44&lang=pt.html

Choose the correct version for your operating system, download and install it as you usually do with other software.

2. Download Digisigner

A nice bit of software that I just now discovered is DigiSigner, which you can download from:

http://www.digisigner.com/downloads.html

The Zip version works with any system that has Java installed.

3. Configure DigiSigner to work with the Smart Card

On Windows, the middleware software will automatically install the certificates and these immediately available to choose. But, using Linux, it requires a manual configuration of the smart card.

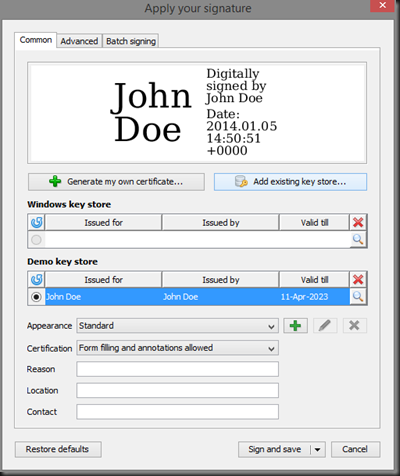
For this, when applying your signature, follow these steps:

  1. Open a pdf document, choose “sign document” and choose the placement for your signature
  2. Choose “Add existing key store…” option;
    Screenshot 2014-01-05 14.51.03
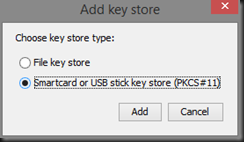
  3. Select “Smartcard or USB stick key store (PKCS#11)“
    Screenshot 2014-01-05 14.58.18
  4. Choose a friendly name and input:
/usr/local/lib/libpteidpkcs11.so
[<img title="image" border="0" alt="image" src="//lh6.ggpht.com/-QddBhGHDdkI/Usl5OI2QH3I/AAAAAAAAoB0/nfOCznLBgtY/image_thumb%25255B1%25255D.png?imgmax=800" width="310" height="147" />][5] 

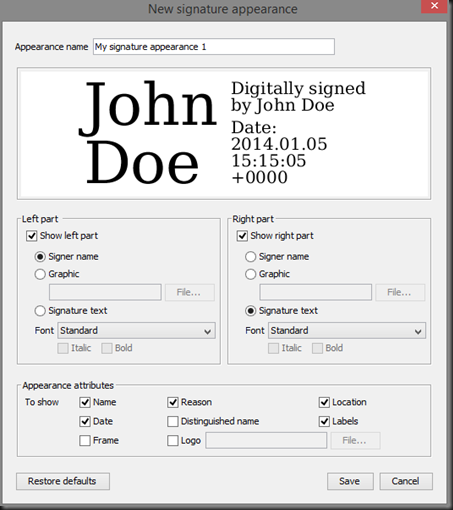
4. Personalize your signature

After setting it up you can personalize your signature at will among several fonts, texts, images and so on.

Screenshot 2014-01-05 15.15.13

Conclusion

It took me quite a while to find a nice bit of software and to get it to work with my Citizen Card so I hope this might be useful for anyone looking for a way to sign pdf documents for free using any Operating system.

Configuring a WHM (cPanel) server to support RVM and Passenger

The well-known hosting control panel WHM (aka cPanel) support for ruby seems to have been mostly dropped and basically nothing ruby-related is currently manageable through the control panel.

Inspired by this post by Dave James Miller I went on to test the installation of the ruby stack on a cPanel server. In the end, I got a nice setup with a Spree store using Passenger with RVM.

Following I’ll present the steps that ended up working for me.

What was used

  • CentOS 6.4
  • cPanel 11.36

What we’re going to install

Ruby Version Manager makes it easy to install multiple versions of Ruby into your home directory. We’ll use that to install Ruby 1.9.3 separately from the cPanel-provided version 1.8.7.

Phusion Passenger (a.k.a. mod_rails) is an Apache module that lets you run multiple Rails apps under a single Apache instance.

Install RVM, Ruby & Phusion Passenger


1. Create a new user

For this I decided to go out of the cPanel way of doing things and just add a user the “old fashioned way”:

useradd ruby

This way, we avoid having to attribute a subdomain and even allowing it to login to the machine using a password. Given that the server does not allow password-less (apart from private keys et al) ssh attempts I can’t think of an easier way to setup a user for this purpose. Simply su to the user and setup your authorized key (you can probably just run /bash/bin --login).


2. Install RVM with the user created (ruby)

Login as the user ruby and install RVM:

bash < <(curl -s https://raw.github.com/wayneeseguin/rvm/master/binscripts/rvm-installer)

You should probably re-login now in order to activate RVM.

After this, you’ll need to make sure you have everything the server needs for RVM. A useful step is to make RVM autolibs read-only (so it doesn’t try to run sudo commands):

rvm autolibs read-only

Now, you can run

rvm requirements

In my case, one of the missing requirements was libyaml-devel. To install it, you probably have to add the RHEL EPEL Repos for CentOS. Back as root, run:

wget http://dl.fedoraproject.org/pub/epel/6/x86_64/epel-release-6-8.noarch.rpm
wget http://rpms.famillecollet.com/enterprise/remi-release-6.rpm
rpm -Uvh remi-release-6*.rpm epel-release-6*.rpm

Once installed you should see some additional repo definitions under the /etc/yum.repos.d directory.

$ ls -1 /etc/yum.repos.d/epel* /etc/yum.repos.d/remi.repo
/etc/yum.repos.d/epel.repo
/etc/yum.repos.d/epel-testing.repo
/etc/yum.repos.d/remi.repo

You should no be able to install all the requirements mentioned by rvm.


3. Install Ruby

Now, to install ruby, it’s the usual RVM command:

rvm install 1.9.3
rvm --default 1.9.3

You could just as well go for version 2.0.0 of ruby.


4. Install Bundler

You’ll also need Bundler installed, so let’s install it now:

gem install bundler


5. Install Phusion Passenger

gem install passenger
passenger-install-apache2-module

Passenger will give you some code to add to your Apache config – make a note of it.

Now log in as root again and add that code to /usr/local/apache/conf/includes/pre_main_global.conf. e.g. My code was:

LoadModule passenger_module /home/ruby/.rvm/gems/ruby-1.9.3-p429/gems/passenger-4.0.4/libout/apache2/mod_passenger.so
PassengerRoot /home/ruby/.rvm/gems/ruby-1.9.3-p429/gems/passenger-4.0.4
PassengerDefaultRuby /home/ruby/.rvm/wrappers/ruby-1.9.3-p429/ruby
PassengerResolveSymlinksInDocumentRoot on

Please refer to Passenger Documentation about the PassengerResolveSymlinksInDocumentRoot option that I added. Basically it allows me to use the default ~/public_html as a symlink to the real path in my Rails apps.

Now rebuild Apache config:

cp /usr/local/apache/conf/httpd.conf /usr/local/apache/conf/httpd.conf.bak-modrails
/usr/local/cpanel/bin/apache_conf_distiller --update
/scripts/rebuildhttpdconf
/etc/init.d/httpd restart


6. Share RVM across accounts

Since all ruby apps are controlled by myself I decided to go for a shared installation of RVM. To allow other users to have full access to the rvm installation, just run:

chmod -R g+w ~/.rvm/
find ~/.rvm/ -type d -exec chmod g+s {} \;

This will give group (ruby) writing permissions on files and folders inside RVM. Now, just need to add the user to the ruby group to give them access:

usermod -a -G ruby ruby_user

Last step to share rvm, which was a bit tricky but I finally got it working by appending the following to each ruby_user’s .bashrc (or .bash_profile):

PATH=$PATH:/home/ruby/.rvm/bin # Add RVM to PATH for scripting

export rvm_prefix='/home/ruby/'
export rvm_path='/home/ruby/.rvm'
source /home/ruby/.rvm/scripts/rvm


7. Use gemsets in Passenger

In order to use gemsets I followed RVM's Passenger integration guide, and used the .ruby-version config file in the project root:

echo 1.9.3@my-app-name > .ruby-version

Then in the rails project, add a new file config/setup_load_paths.rb with:

if ENV['MY_RUBY_HOME'] && ENV['MY_RUBY_HOME'].include?('rvm')
begin
gems_path = ENV['MY_RUBY_HOME'].split(/@/)[0].sub(/rubies/,'gems')
ENV['GEM_PATH'] = "#{gems_path}:#{gems_path}@global"
require 'rvm'
RVM.use_from_path! File.dirname(File.dirname(__FILE__))
rescue LoadError
raise "RVM gem is currently unavailable."
end
end

# If you're not using Bundler at all, remove lines bellow
ENV['BUNDLE_GEMFILE'] = File.expand_path('../Gemfile', File.dirname(__FILE__))
require 'bundler/setup'

I’m yet to test using different versions of ruby but this works like a charm for gemsets without the need to install them to the vendor/bundle path.

Technorati Tags: ,,,

NetRumble – options menu, bots and video

As I said in the previous post I was thinking about the best way to automate the gameplay in the game and I decided to go with the artificial intelligence and implemented some logic in order for the ships to move around and shoot and make some sense doing so. Basically, they just wonder around the arena up to a maximum distance from the center (for them not to get stuck in corners) until they get close enough to an enemy ship in which case they initiate the pursuit and try to shoot them. A small trick for them not to just get stuck to each other was to define a minimum distance that they try to maintain from the enemy.

Since the number of options was growing I’ve added an options menu where it’s possible to configure desired resolution, to run or not in full screen, enable/disable bots and others.

Following is a video of the 2 bots as seen by the client (host is the green one) using VFC to reduce the network load. It’s possible to see in the video the varying quantity of data received (in Bytes per Second - shown on the bottom to the left) by the client depending on the distance of the enemy and asteroids. It’s also clear that there the enemy makes some “jumps” when he’s coming from outside the larger circle (which indicate the different consistency zones) due to inconsistency between the opponents’ known position and “real” position.

Net Rumble Gameplay with VFC
Technorati Tags: ,,,,

More bugs and test analysis

I discovered a couple more bugs in the game, related to features added by me. After introducing the player IDs I run a couple tests and the IDs seemed to be correct on all the machines but, as it turns out, they weren't. Fixed this by initializing every time a player joins the game. The host is the responsible for sending out the correct data. Another bug that happened when the host exited the game in the Lobby screen was also fixed (just another verification of the network session. The feature of joining the game in progress was also broken because of a couple initializations that were missing - fixed.

Simulate latency and packet loss

I've also been working in ways of collecting interesting data with this VFC implementation. I was thinking about using a XNA feature that enables the simulation of a typical Internet conditions on a LAN. By using the SimulatedLatency and SimulatedPacketLoss properties of the NetworkSession I thought would be able to simulate the desired conditions. As it turns out there are a couple of issues with these simulated properties. First, they also affect local data and the server would lose data that it sent to itself. Tried to work around it by setting this up in a per-send basis but didn't work. Seems like it isn't able to identify which packets are to be delayed or not. I also think that these simulation properties don't work well with XNA's reliable communication, I believe that even packets sent with the Reliable option get caught in the packet loss simulation (which shouldn't since the framework itself guarantees it's delivery).

Simulating actual conditions found in the Internet for the gameplay is a major concern. For this reason I've been trying to find and test different tools that simulate a WAN on a LAN. There are a couple commercial solutions that work but I'm still unable to find an open source or at least free tool that would work as expected on a windows machine. For now, I'm using a trial version of Shunra VE Desktop Standard and it looks pretty good for the purpose intended. Already tested a couple variables and the network starts to get annoying at about 200ms of latency with 10% packet loss. Still I'm yet to try other parameters for the VFC requirements so it's possible to tolerate bigger limits on the latency and packet loss.

Data transferred

There are other very useful properties in the XNA framework NetworkSession: BytesPerSecondSent and BytesPerSecondReceived. Using these it's possible to see the actual bandwidth used in each scenario of the game. Even with only two players it's possible to see the difference when they are close or far from each other, varying from around 1.5kBps to 250B of data sent by the server. The data received by the server is constant and shouldn't be a problem since it's about only 1kBps for each player.

Artificial Intelligence vs Repeated Input

I've been trying to think about the best solution in order to test the behavior of the game with more terminals and concurrent real players. I have two approaches in mind:

Making some basic artificial intelligence that would only chose the input and send it to the host (the same way a player would do), nothing very smart is needed, just that it keeps moving and shooting around;

Or recording the input from a game and replaying it on several machines.

I believe the first alternative is the best one since it should be quite easy, given the position on the arena to choose where I want to move and shoot. It's irrelevant whether the bots are really aiming at a target or if they are just shooting and moving around. The most important thing is that they keep moving around getting closer and further away from each other so that it is possible to observe a correct flow of the game.

VFC implementation and first results

Finally I got to the main implementation and use of the VFC model for the NetRumble game.

In order to keep the class as simple and separated from the specific game (Net Rumble) as possible, I used interfaces which must be implemented by the game objects that are intended to be pivots. I'm already using it on the asteroids and the player's ships.

It's working just as expected for the asteroids and the ships movement. From the first tests I did it's clearly observable the difference in the movement of asteroids and, specially, ships. Using the scale parameter to choose the area shown in each player it's possible to see the enemy ships further away and analyze their behavior depending on the consistency zone in which they are. The jumps in the positions of the ships are very frequent in the outer areas and their movement is smooth in the inner areas, where consistency requirements are tighter. The tightest area of the game should include all or most of the player's original view of the game.

There's still one issue I have to deal with in order for the game to run correctly. At this moment I'm using the ship pivot for the input and for the position. The player input includes the movement and the firing of projectiles. I need to change the way the firing is handled and create a new message type for projectiles. Then, the projectile would become a pivot and would be sent to all players accordingly.

Soon I'll try to post a video feed of the gameplay for you to observe the given behavior. I'll also now start making some tests to check how much bandwidth is used with and without the use of VFC and collect other useful information about the communication.

Technorati Tags: ,,

PacketWriter status and more bug fixes

Well, as I said in my last post I made a new custom PacketWriter class. It's working fine and compatible with the PacketReader on the other side, by instinct since the order in which each member is written/read from the packets is not specified. It only requires one more step before beginning each packet to Reset the packet, but becomes much more flexible in terms of reuse of the same packet to send to a group of peers.

I've also done some refactoring of the code more specific to the VFC implementation: drawing of the consistency areas identification, custom packet writer, and so on. It is now packed in a different namespace.

Since I allowed the players to join the game in progress there were a couple bugs in the state of the current game when a player joined, in particular:

  • he wouldn't see a power up had already been spawned - the host now checks for a power up when the player join and sends it's spawn message;
  • wouldn't know about the current weapon of each of the other players (if they had caught a power up earlier) - the periodic status packet for each player now includes the current weapon he has.

Some other bug related to the change to the client-server architecture was the acceleration of the other players comparing to the host. The other players would be slower. To pass this around it is only needed to use the same direction input while another packet with new input is not received by the host. It works like a charm.

Group communication in XNA

The XNA framework includes a helper class called PacketWriter. PacketWriter provides common functionality for efficiently formatting outgoing network packets. Using this class is useful when the messages are sent only to one or all the peers. Since most of the packets my host will be sending are for a group of peers, just a few of the participating players, I'll need to make my own helper class so I can choose when I want the packet to be reset, after sending it out to the desired clients.

I've done the custom packet writer class and will now make the migration and test of this new class.

Centralized architecture done + new features

Everything seems to be working fine with the new architecture in the Net Rumble game. Now all messages are sent to the Host and sent to all members through him. Although some more verifications should be done by the Host for now, most of the elements of the game are ready for the implementation of the VFC model with the Host of the game responsible to calculate all the distances between players so it's possible to know the different requirements of consistency for each players zones.

Besides that, I've added the possibility for players to join the session during the game so players can now dynamically enter and leave the game as they wish, like most of the online FPS. For that, the Host automatically sends the current state of the game to the new player joining the session. In order for players to be able to find the session the flag AllowJoinInProgress of the network session must be set to true (XNA framework).